Accessing a SQL Server Instance Using Containers and DxConnect
Applies to:
- DxOdyssey 19.5 and newer
Summary
This article assumes that a SQL Server instance located at Site A is listening on port 1433, and clients at Site B do not have direct network access to Site A. The steps below describe how to create a tunnel that clients at Site B can use to access the SQL Server instance at Site A.
Information
-
Pull a DxOdyssey Docker image.
docker pull dh2i/dxodocker pull dh2i/dxo:xenialdocker pull dh2i/dxo:centos7 -
Start the DxOdyssey container.
- DxOdyssey requires TCP port 7979 for gateway group administration using the DxOdyssey Client UI. The -d flag runs the container detached, -h assigns the container hostname, --name specifies the name the Docker host uses for the container, -v creates a new /etc/dh2i volume mount, and -p is for each port mapping assigned to the container. The following command example shows port 17979 being mapped to port 7979 for the DxOdyssey Client UI connection. If multiple containers are being run on the same server, then the mapped ports need to be unique for each container.
docker run -p 17979:7979 -d -v dxoVolume:/etc/dh2i -h <SITE_A_HOSTNAME> --name <SITE_A_NAME> dh2i/dxo -
Start a new shell in the container by executing
docker exec -it <SITE_A_NAME> bash. -
Activate the gateway with a license key by executing
dxcli activate-server <license_key>. -
Create a tunnel for SQL Server.
-
At the very minimum, DxOdyssey tunnels require the tunnel name, tunnel status, destination gateway, destination port and IP, origin gateway, and origin port and IP defined in the command. It is not required to add a source filter or join the tunnel to a tunnel group.
-
The destination gateway may also be defined as the origin. An example
dxcli add-tunnelcommand might look like this:dxcli add-tunnel SQL_TUNNEL true <SITE_A_HOSTNAME> <SQL_HOST_IP>:1433 <SITE_A_HOSTNAME>,127.0.0.1:11433
-
-
Create a client.
-
Clients can be created using the
dxcli add-clientcommand; configuration of the clients is done through other commands. For example:dxcli add-client <CLIENT_NAME> <CLIENT_PASSWORD>
-
-
Add the client to the tunnel.
-
Clients are added to tunnels using
dxcli update-tunnel-clientsand feeding the command the client name, IP address, and port. For example:dxcli update-tunnel-clients SQL_TUNNEL <CLIENT_NAME>:127.0.0.1:21433
-
-
Enable NAT matchmaking by executing
dxcli set-globalsetting nat.enabled true. -
Export the client config file to the Docker host.
- Execute
dxcli export-config dxconnect.dh2ito create a DxConnect configuration file.
infoThe file extension must be specified in the command. If no directory is specified, the file will be generated in the current working directory.
-
Exit the container by typing
exit. -
Copy the dxconnect.dh2i file from the container to the Docker host.* The command
docker cpis used to copy data between the container and Docker host. In this example, the dxconnect.dh2i is located in the container's root directory. The command to copy the file to the Docker host might look like this:docker cp <SITE_A_NAME>:dxconnect.dh2i ./
infoThis will copy the file to the current working directory of the Docker host.
- Execute
-
Copy the client configuration from the Docker host to the DxConnect client machine.
-
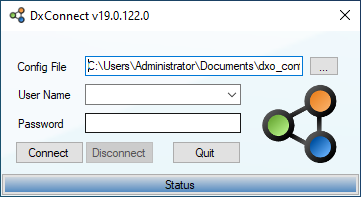
Launch DxConnect.
-
Select the location of the config file by clicking on the ellipses (...).
-
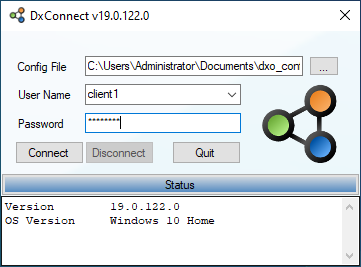
Enter the username and password and select Connect. The status button can be selected for more detailed connection information.
-
After the tunnel connection is established, launch SQL Server Management Studio (SSMS).

-
At the SSMS login window, ensure Database Engine is selected for the server type. Enter the connection information for the tunnel.
-
The IP and port combination used to connect to the database is the same combination that was defined in the
dxcli update-tunnel-clientscommand; this information is visible in the detailed connection information for DxConnect. -
SQL Server separates the IP from the port using a comma (,).
-
-
Select Connect to connect to the instance.