Configure SSL Certificates for Microsoft SQL Server with DxEnterprise
Summary
Steps on how to configure SSL certificates for Microsoft SQL Server instances virtualized with DxEnterprise.
Information
To configure a SQL Server instance virtualized by DxEnterprise to use encrypted connections, you must first create a SSL certificate meeting SQL Server’s requirements. Certificates may be self-signed, or signed by a domain or other CA. The requirements are described in the following Microsoft document:
In addition to the basic requirements, a certificate used in a virtualized instance must have its Common Name field set to the fully qualified domain name (FQDN) of the virtual host. Many user-friendly tools to create certificates, such as the IIS Manager’s Server Certificates pane, will create certificate requests with the Common Name field set to the physical host name and not the Vhost, and clients will reject certificates created like this when asked to connect to the Vhost, because the Vhost name does not match the Common Name. In general, do not use IIS Manager to create SQL Server certificates.
You must use the same certificate and private key pair on all nodes potentially hosting the instance.
When you create the certificate, you will export it to the .PFX file format, which encapsulates both the certificate and associated private key. The .PFX format permits the certificate and private key to be conveniently imported on to all nodes in the cluster. For convenience, exporting to the .CER/.CRT file format is not recommended.
The .PFX file must be imported into the Personal certificate store of the account assigned to the SQL Server instance, on every node configured to host the instance. The correct way to do this depends on whether the SQL Server instance is configured to use the Local System account.
For SQL Server instances configured to use some account other than Local System, log in to the server with that account. Then, locate the PFX file in Windows Explorer, right-click, and select Install PFX:

Follow the Certificate Import Wizard to import the certificate to the Personal certificate store.
Otherwise, if the SQL Server instance is configured to use the Local System account, you must log in with an account that has administrative privileges.
-
Launch the Microsoft Management Console. Select File > Add/Remove Snap-in:

-
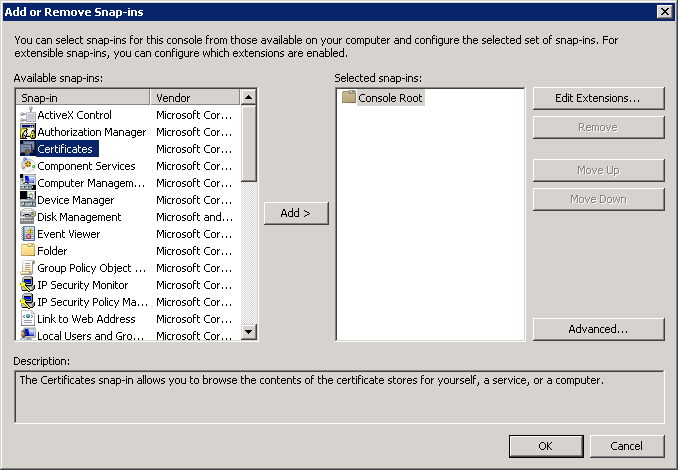
Add a Certificates snap-in:

-
Select Computer account:
-
Use Local Computer:
-
With the snap-in now configured, right-click on the Personal certificate store folder, select All Tasks > Import:

-
Use the certificate import wizard to select the .PFX file to import.
-
Follow the import wizard instructions. Enter the password set when the PFX file was created. Ensure that Include all extended properties is selected:
-
Select Place all certificates in the following store and choose the Personal store:
cautionMicrosoft document describing potential problems creating and importing SQL Server certificates:
Once the certificate has been imported on to all nodes potentially hosting the instance, the instance must be configured to use the certificate.
The SQL Server configuration manager for SQL Server 2008/R2 has an obscure option to set the certificate associated with an instance, by opening the SQL Server Networking Configuration, right-clicking on Protocols for <instance>, and opening the Certificate tab. However, this method cannot be used to select any certificate other than a machine certificate for servers that belong to a domain, which will not work for a virtualized instance.
-
Find the Thumbprint of the certificate, and copy it to the clipboard. In the certificate management console, it can be found by opening the certificate, selecting the Details tab, scrolling to the bottom of the field list, and selecting Thumbprint:

-
After locating the thumbprint, copy it out of the certificate viewer, paste it into notepad, remove all of the spaces, and copy the modified thumbprint back to the clipboard. Be careful – it’s easy to make a mistake:
-
On the node that is currently hosting the instance:
-
Open regedit
-
Navigate to:
HKLM\Software\Microsoft\Microsoft SQL Server\<instance_name>\MSSQLServer\SuperSocketNetLib -
Locate the Certificate entry
-
Assign its value to the thumbprint copied out of the certificate.

-
-
The instance must be restarted for the changes to take effect. To do so, right click on the SQL Server instance under the Vhost and select Stop instance then Start instance. The instance may be failed over on to another node to accomplish the same.