DxPlus Admin Guide
DH2i DxPlus offers you the ability to boost your application's throughput. DxPlus uses DH2i's patented Zero Trust Network Access (ZTNA) tunneling technology to create secure tunnels between replica servers. These ZTNA tunnels then transmit TCP payloads via UDP for superior performance and security. Simply install the lightweight agent on each of the application servers, activate and join the agents together. Once configured, the agent can then tunnel your application data and boost performance.
Supported Operating Systems
- Windows Server 2012, x64
- Windows Server 2012 R2, x64
- Windows Server 2016, x64
- Windows Server 2019, x64
- Windows Server 2022, x64
- Windows 8 and above, x86 and x64
- CentOS Linux 7.x
- RedHat Enterprise Linux 7.x
- RedHat Enterprise Linux 8.x
- Ubuntu 16.04.x
- Ubuntu 18.04.x
- Ubuntu 20.04.x
- Ubuntu 22.04.x
DxPlus Software requires .NET Framework 4.5.2 on Windows and .NET Runtime 6.0 on Linux. Please ensure that these packages are installed on your servers prior to installing DxPlus Software.
Connect to DxPlus Web Management Console
Open a browser and connect to the DxPlus agent on port 7985.
http://<dxplus-agent>:7985

Select Not Connected in upper right corner and then select Login and enter the passkey to connect to the agent.

Main Menu
Once connected, the main menu is then displayed.

Quick View
Quick view shows currently boosted availability groups.

- Name - Name of the availability group.
- Replica Server - Name of the server hosting the replica.
- Saved Endpoint - The saved endpoint for each replica prior to boosting.
- Tunnel Port - Port on which the tunnel connects.
Before adding or removing a replica from a boosted availability group, make sure to revert the DxPlus records for that availability group first. Once the replica member count is correct, then boost the availability group again. This ensures that DxPlus will pick up all replicas in the availability group when creating tunnels.
Boost SQL Server Availability Groups
DxPlus can greatly improve your SQL Server availability group database replication through DH2i proprietary Zero Trust Network Access (ZTNA) tunneling technology. To start boosting your SQL Server availability group, select Boost SQL Server Availability Groups menu option.
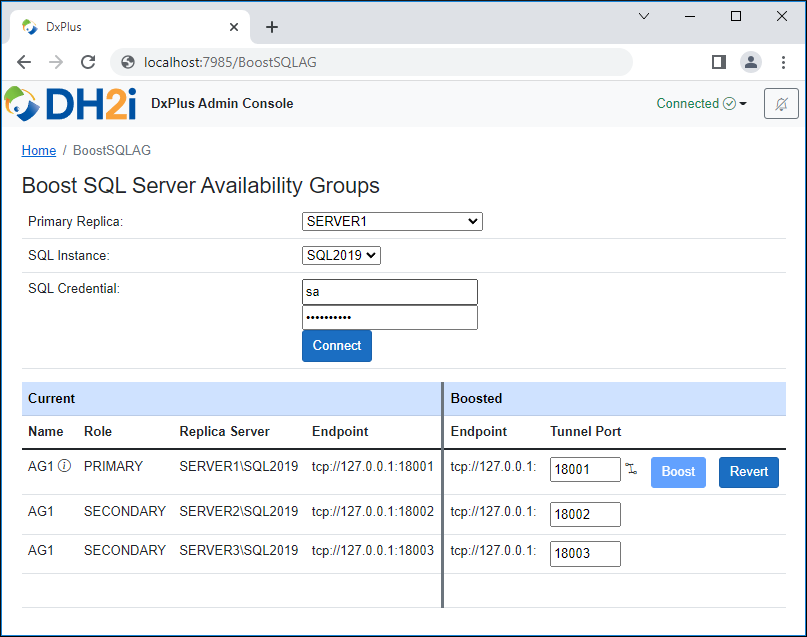
At the Boost SQL Server Availability Groups dialog:
-
Select a Primary Replica for the availability group.
-
Select the SQL instance.
-
Specify valid credentials for the SQL Server instance.
-
Click Connect.
-
If the connection to SQL Server is successful, a list of availability groups in which the current agent is the primary replica will be presented.
-
If desired, specify a unique starting (TCP) tunnel port for DxPlus to use. Leave the default value (0) to let DxPlus dynamically determine a starting tunnel port.
-
Click Boost to instruct DxPlus to reconfigure the availability group to use DxPlus tunnels for its database mirroring endpoints. If the operation is successful, the dialog should refresh and display the new endpoint_url values for the availability group.
If you have a need to disable or remove DxPlus boosting capability for your SQL Server availability group, simply click Revert button to instruct DxPlus to restore the original configuration for the availability group.
When boosting or reverting an availability group with DxPlus, there will be a brief interruption to the availability database replication.
Optionally, you can click on the info circle next to the availability group name to retrieve more details about your availability group.

Another option is to click on the tunnel icon next to the Boost button to see the tunnel details.

Manage Membership
To view the current membership status for all joined agents, select the Manage Membership from option menu.

At this dialog, you can re-activate licensing for any active agents, or deactivate them. Simply click on the Activate or Deactivate button to apply.
Optionally, you can remove an agent from the agent group by clicking on the Red X button.
-
Automatic over the internet - Activation using the server's internet connection.
-
License Code - The DxPlus license code obtained from DH2i.
-
Manual activation - When the server is not connected to the internet, a license request blob is generated for the license code and must be activated from a workstation with internet access using the Client Portal. Once a license answer blob has been generated, it needs to be copied into the text box at the bottom of the license activation window.
-
Activate - Click to activate the server with the license key.
-
Close - Click to cancel the process without making any changes.
The Activate option will automatically activate the license using the server's internet connection. If no internet access is available on the server, then the Manual option will need to be used instead.
Automatic Activation
Leave the radio button on the default setting (Automatic over the internet). Enter the license code, check the Accept EULA box and select Activate.

Manual Activation
Select this option if the server does not have internet access. A license request will be generated from the supplied license code and must be activated through the DH2i Client Portal from a workstation with internet access. Once an license answer has been generated, copy and paste the result into the License field, check the Accept EULA box and select Activate.

Manage Global Settings
The DxPlus agents join together into a group to provide boosting capability for specified applications. There are various global settings that control and tune how the agents should function in the group. To manage these global settings, select the Manage Global Settings option menu.

At this dialog, you may set a custom value for each setting that is applicable to your environment. Click Reset button to instruct the system to use default value for the setting. Click Apply button to commit the changes.
Collect Logs
When troubleshooting and diagnoses are required, DH2i Technical Support team may need access to DxPlus logs. To instruct the system to gather logs, select Collect Logs option menu.

At this dialog, select the desired DxPlus agent(s) and click Submit to generate the logs. A zip file will be placed at the following location on each agent server:
- Windows -
%ProgramFiles%\DH2i\support - Linux -
/opt/dh2i/support
Please upload the logs to the [Client Portal](https://clients.dh2i.com/Uploads/].
Logout and Change Passkey
To disconnect from the agent, select Connected in the upper right corner and then select Logout option menu.

To change the passkey to the agent group, select the Change Passkey option. Enter the new passkey for the agent group and click OK button to commit. Click Cancel button to exit the dialog without applying changes.
