Windows Installation Quick Start Guide
Introduction
This quick start guide describes how to install DxEnterprise on a Windows server. Using this guide, the user will install DxEnterprise dependencies and software, then join a second server (node) into a cluster.
Prerequisites
-
A physical or virtual machine running a supported Windows operating system. A second machine is required for joining two nodes into a cluster. For information about supported operating systems, view the DxEnterprise Admin Guide.
-
A valid DxEnterprise license. A fully featured Developer Edition is available free for non-production use. To purchase DxEnterprise software for production workloads, visit the DH2i Store.
-
Ensure the server hostname is set and unique.
-
Set host resolution for all servers (nodes) that will be participating in the cluster by adding their entries to the hosts file located at
%SystemRoot%\System32\drivers\etc\hosts.
Installation
This section covers preparing the node and installing DxEnterprise.
Update Server and Install Dependencies
-
Ensure the VM is up-to-date using Windows Update or sconfig.
-
Install Microsoft .NET Framework 4.5.2 if it is not already installed.
Install DxEnterprise
-
Copy the DxEnterprise
.msito the server. -
Double-click the DxEnterprise setup program.
-
A welcome screen will be displayed. Click Next to continue with the installation.

-
Select I accept... to accept the software license agreement and click Next to continue.

-
OPTIONAL: In the Destination Folder window, select an installation folder for DxEnterprise.

-
Select Next.
-
In the Ready to Install window, select Install.
-
Select Finish to complete the installation.

Configure DxEnterprise Using DxConfiguration Manager
DxConfiguration Manager is a client tool used to configure first-time DxEnterprise installations on Windows. After the configuration is completed, administrators can use DxEnterprise’s management UI, DxAdmin, for cluster management. See the DxConfiguration Manager Admin Guide for more information.
-
Start DxConfiguration Manager by double-clicking the desktop shortcut.
-
At the main screen, select Set Interface

This dialog allows the user to select interface(s) for DxEnterprise or DxOdyssey to use, ordered by priority from top to bottom.

-
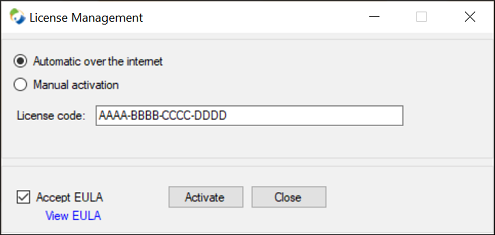
At the main screen, select Activate License.

-
In the License Management window, enter the DxEnterprise license key (including dashes) in the license code box, check the Accept EULA box, and select Activate.
-
After the server successfully activates, close the License Management window to return to the main menu.
-
-
Prepare the node so other members can join the cluster.
- NAT Join
- Local Join
DxEnterprise can utilize NAT Matchmaking Service to easily connect servers across the internet.
cautionIf you are unsure, you should verify that your license supports NAT and tunneling features before setting a One-Time PassKey. Visit the Client Portal to view license status. Alternatively, you can run the command
dxcli get-producttypeand verify that NAT and TUN are listed. To enable availability group management and/or tunneling features, please contact your DH2i account representative.-
Click Manage OTPK to set a One-Time PassKey for the cluster that can be used by other nodes to join the cluster via NAT.

-
Select New, and a window will appear for setting the expiration time of the OTPK.

-
Choose a time and date for expiration (or leave the default), the select Set to generate the OTPK and close the window.
-
Save the OTPK for later so it can be used to join the second node to the cluster.
-
OPTIONAL: At the main menu, select Set Passkey to open the Passkey Management window.
infoSetting a cluster passkey is not required for NAT joins. However, a cluster passkey is required for remote cluster management.

-
Enter a passkey for the cluster and select Submit.
-
After the passkey is successfully set, select OK to return to the main menu.
-
-
Select Set Passkey to open the Passkey Management window.

-
Enter a passkey for the cluster and select Submit.
-
After the passkey is successfully set, select OK to return to the main menu.
-
Configure Additional Cluster Members
-
Complete all the steps in the Installation section for the second node.
-
Start DxConfiguration Manager by double-clicking the desktop shortcut.
-
Activate the server using the instructions from step 3 of the previous section.
-
At the DxConfiguration Manager main menu, select Join Membership.

- NAT Join
- Local Join
-
Select the Join via NAT Match Agent checkbox.
-
Leave the Target Member field with the default value of match.dh2i.com.
-
In the Pass Key field, paste (or type) the OTPK.
-
Select OK to join the cluster via NAT.
-
In the Target Member field, enter the IP address or hostname of the fist node.
-
In the Pass Key field, enter the cluster passkey.
-
Select OK to join the second node to the cluster.
-
Close the DxConfiguration Manager window.
Next Steps
- SQL Server Availability Groups with DxAdmin Quick Start Guide
- exVhosts for AG with DxAdmin Quick Start Guide